**This article refers to an older version of the Facebook developers page and api, and may have changed since the writing**
Being the biggest social network on the internet, Facebook has helped companies all over the world connect effectively to their target market. A lot of websites are now integrated with Facebook because of a number of advantages such as profit generation, faster user authentication, increased website traffic, brand awareness, and customer communication.
There are many ways to integrate Facebook in your website. There are several solutions available for Django developers which include django-facebookconnect, pyfacebook, and minifb. The problem with these solutions is that the Facebook API quickly changes. Most of the methods become deprecated or their behaviors change suddenly within 6 to 12 months. In addition, these solutions do not provide minimalist and non-invasive integration.
In this two-part tutorial, we will integrate our Django project with Facebook using the Javascript SDK, Python SDK, jQuery. This part will involve setting up a new Facebook application and including the Javascript SDK in the project. The second part will involve the usage of Facebook’s Python SDK together with the Javascript SDK. You can do a lot of things with the Javascript SDK alone but together with the Python SDK you can do much more.
We will attempt to provide a minimalist, portable, and non-invasive solution using the Javascript SDK in this tutorial. We will start first with a quick 4-step procedure regarding setting up of a new Facebook application and then follow it with the usage of the Javascript SDK in our project.
Setting up a new Facebook application
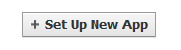
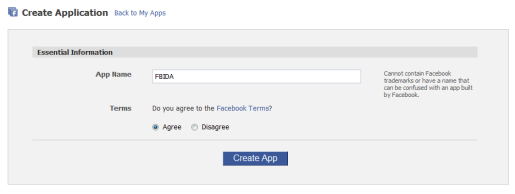
Step 1: Go to http://www.facebook.com/developers/ and click Set Up New App
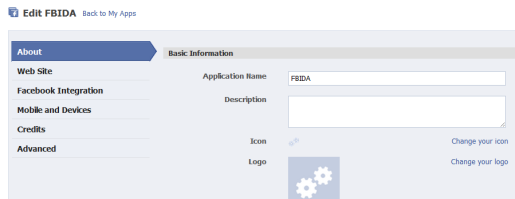
Step 2: Input in the Essential Information of your application. In our example, we are going to use FBIDA (Facebook Integration Django App) as the name of our application. It does not need to have the same name as your Django project.
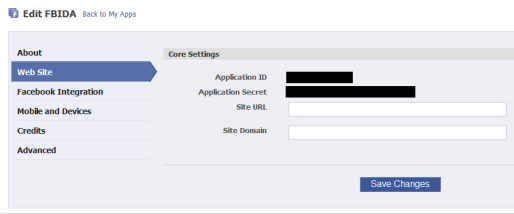
Step 3: Upon submitting the initial app information, you will be redirected to the Edit App Settings page. Here, you can change a lot of things regarding your application including its description, icon, logo, site URL, site domain, canvas url, and bookmark url. The most important of these is the site URL which is found under the Web Site tab. It’s the only thing you need to change or set to make your website connect with Facebook. You can change the other details later.

Step 4: Click on Web Site to edit the Core Settings of your app. Since we are trying out Facebook integration locally, input http://localhost:8000/fbconnect/ as the Site URL in the Core Settings. Save your changes afterwards. You may change this later when you are no longer hosting your app locally.
Including Facebook JavaScript SDK with Django
The Facebook JavaScript SDK provides access to the features of Facebook’s Graph API using JavaScript. It gives you access to all of the features of Facebook Dialogs as well. Facebook also provides a JavaScript Test Console for testing and debugging the JavaScript SDK methods.
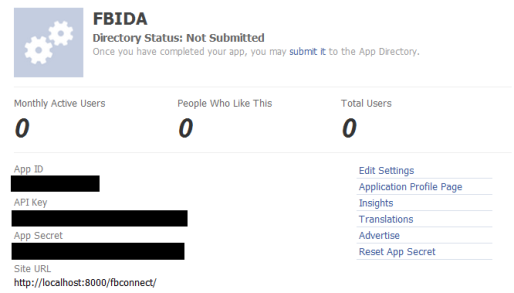
Step 1: Store the App ID, API Key, and App Secret of your application in your settings.py. You can find these values in your Facebook app’s page.
You can name the variables anyway you want. You may also want to store these values inside local_settings.py for convenience. In our case, we simply store them as FB_APP_ID and FB_APP_SECRET in settings.py.

Step 2: In your views.py, import FB_APP_ID and FB_APP_SECRET from your settings.py and include them to the template’s context.
from django.shortcuts import render_to_response
from django.template import RequestContext
from fbproject.settings import FB_APP_ID, FB_APP_SECRET
def index(request):
    context = {
        'FB_APP_ID':FB_APP_ID,
        'FB_APP_SECRET':FB_APP_SECRET,
    }
    return render_to_response('index.html', context,
        context_instance=RequestContext(request))
As you can see, including the application ID and secret in each of your views is not a good programming practice. Later in this tutorial, FB_APP_ID and FB_APP_SECRET will be removed from views.py completely.
Step 3: Include jQuery in your template page. jQuery is a rich JavaScript library which provides a lot of functionalities for manipulating HTML elements, events, Ajax interactions and the like. At least version 1.4.1 is needed since it includes parseJSON which we will use later in this two part tutorial.
<script type="text/javascript" src="js/jquery.js"></script>
Step 4: Add the following lines to your template body to load the Facebook SDK. Visit this page for more options information loading the Facebook JavaScript SDK.
<!-- Load the Facebook SDK -->
    <div id="fb-root"></div>
    <script src="http://connect.facebook.net/en_US/all.js"></script>
    <script>
        FB.init({
            appId  : '',
            status : true,
            cookie : true,
            xfbml  : true
        });
    </script>
Step 5: Add the following lines to your template head to connect to Facebook. Make sure that popups are enabled in your browser for this to work. Visit this page for more information regarding Facebook login.
<!-- Facebook Login -->
    <script type="text/javascript">
        fblogin = function(success,fail){
            FB.login(function(response) {
                if (response.session){
                    if(response.perms){
                        if (success!=null){
                            success();
                        }
                    } else {
                        if (fail!=null){
                            fail();
                        }<
                    } else {
                        fail();
                    }
                },
            {perms:'read_stream,publish_stream,offline_access,user_photos'});
         };
    </script>
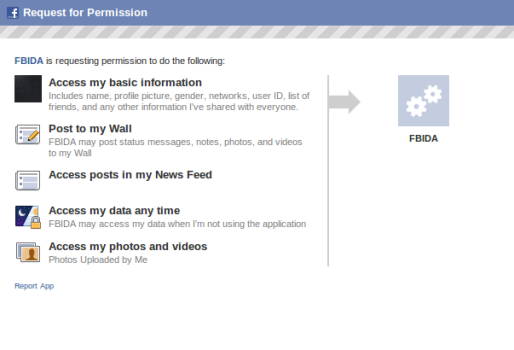
We simply wrapped the following code below in the function fblogin. The permissions included depend on your application’s needs. In our case, we will need these 3 permissions in our two part tutorial. It’s also possible to delay asking for permissions using other techniques to lessen friction to the user’s process. Visit this page for more information regarding Facebook permissions.
FB.login(function(response) {
    if (response.session) {
        if (response.perms) {
            /* user is logged in and
               granted some permissions. */
            /* perms is a comma separated
               list of granted permissions */
        } else {
            /* user is logged in, but did
               not grant any permissions */
        } else {
            /* user is not logged in */
        }
}, {perms:'read_stream,
           publish_stream,
           offline_access'});
You can use this function by simply creating successful and failed login functions which you can pass as parameters to our fblogin function.
<script type="text/javascript">
    function fblogin_success(){
        alert('success!');
    }
    function fblogin_fail(){
        alert('fail!');
    }
</script>
To test if our fblogin function works, add the following lines of code alongside the other JavaScript codes.
<!-- Document Ready functions -->
<script type="text/javascript">
    //functions which are done when the document is ready
    $(function(){
        fblogin(fblogin_success,fblogin_fail);
    });
</script>
The code below is simply a shorthand notation for jQuery’s document ready function. It simply runs any code inside it when the document is ready. For the case above, the fblogin function is called when the document page is ready.
$(function(){
    //insert code here
});
You’ll see that a popup dialog requires you to login to your account.
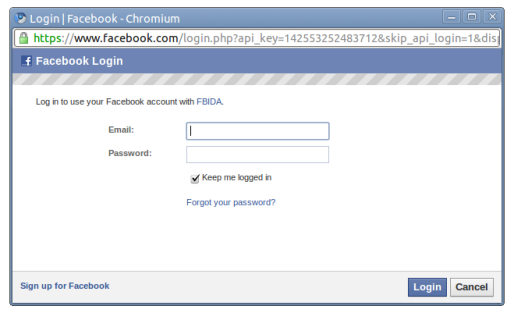
First, click on Cancel to call fblogin_fail. You’ll see an alert box with the fail message on it. Next, refresh the page and then login to your account. You’ll see the permissions page. Clicking on “Don’t Allow” will call fblogin_fail. Clicking on “Allow” will call fblogin_success.

Everytime you call on FB.login(), a popup dialog will be displayed but it will disappear immediately if you are already connected to Facebook with your account.
Step 6: To test if the user is already connected to Facebook, simply add the following lines of code to your template scripts. The function below calls the success function if the user is connected and calls the fail function otherwise.
<!-- Facebook Login Status -->
    <script type="text/javascript">
        function fbconnected(success,fail){
            FB.getLoginStatus(function(response) {
                if (response.session) {
                    if(success!=null) success();
                } else {
                    if(fail!=null) fail();
                }
            });
        }
     </script>
The code above can be used with the fblogin function we created above so that the dialog will only come out if the user is not yet connected to Facebook. The code below, on the other hand, ensures that the fblogin_success function is executed when the user is already connected or when the user has just connected.
<!-- Document Ready functions -->
<script type="text/javascript">
    //functions which are done when the document is ready
    $(function(){
        fbconnected(function(){
            // connected to facebook
            fblogin_success();
        },function(){
            // not connected to facebook
            fblogin(fblogin_success,fblogin_fail);
        });
    });
</script>
Step 7: Note that you can use FB.logout() to log out of Facebook.
Step 8: For reusability purposes, it is better if template tags are used to contain all Facebook related scripts which are used in each template page. For more details regarding the usage of custom template tags and filters, visit this page.
Simply create a directory named templatetags inside your project folder and create an empty __init__.py file inside the templatetags directory. Then create a file named fbconnect.py containing the code below:
from django import template
from django.conf import settings
from fbproject.settings import FB_APP_ID, FB_APP_SECRET
register = template.Library()
facebookLoginScript = """
    <!-- Facebook Login -->
    <script type="text/javascript">
        fblogin = function(success,fail){
            FB.login(function(response) {
                if (response.session){
                    if(response.perms){
                        if (success!=null){
                            success();
                        }
                    } else {
                        if (fail!=null){
                            fail();
                        }
                    }
                } else {
                    fail();
                }
            },
            {perms:'read_stream,publish_stream,offline_access,user_photos'});
        };
    </script>
    <!-- Facebook Login Status -->
    <script type="text/javascript">
        function fbconnected(success,fail){
            FB.getLoginStatus(function(response) {
                if (response.session) {
                    if(success!=null) success();
                } else {
                    if(fail!=null) fail();
                }
            });
    </script>
    """
    class FacebookLoginScriptNode(template.Node):
        def render(self, context):
            return facebookLoginScript
        def facebook_login_script(parser, token):
            return FacebookLoginScriptNode()
        register.tag(facebook_login_script)
        facebookLoadScript = """
            <!-- Load the Facebook SDK -->
            <div id="fb-root"></div>
            <script src="http://connect.facebook.net/en_US/all.js"></script>
            <script>
                FB.init({
                    appId  : '%s',
                    status : true,
                    cookie : true,
                    xfbml  : true
                });
            </script>
    """ % FB_APP_ID
    class FacebookLoadScriptNode(template.Node):
        def render(self, context):
            return facebookLoadScript
        def facebook_load_script(parser, token): return FacebookLoadScriptNode()
        register.tag(facebook_load_script)
With the usage of template tags in our application, views.py and the template page will be much simpler.
#views.py
from django.shortcuts import render_to_response
from django.template import RequestContext
def index(request):
    context = {}
    return render_to_response('index.html',
        context,
        context_instance=RequestContext(request))
#index.html
<html>
<head>
    <!-- JS Files -->
    <script type="text/javascript" src="js/jquery.js"></script>

    <!-- Document Ready functions -->
    <script type="text/javascript">
        //functions which are done when the document is ready
            $(function(){
                fbconnected(function(){
                    // connected to facebook
                },function(){
                    // not connected to facebook
                    fblogin(fblogin_success,fblogin_fail);
                });
            });
    </script>
    <script type="text/javascript">
        function fblogin_success(){
            //logged in user
            alert('success!');
        }
        function fblogin_fail(){
            //guest
            alert('fail!');
        }
    </script>
</head>
<body>

</body>
</html>
Notice that the application’s ID and secret are no longer involved in views.py. The only files that currently contains Facebook variables and methods in this integration are settings.py, index.html, and templatetags/fbconnect.py. Note that using Django template tags, you can easily “import” the javascript functions in several pages without much redundancy. You can alter templatetags/fbconnect.py anyway you want to fit your preferences.
Step 9: You can use FB.api function to obtain user data such as user profile information, friends, news feed, likes, movies, music, and the like. FB.api allows you to make an API call to Facebook’s Graph API. To demonstrate this functionality simply follow the instructions below.
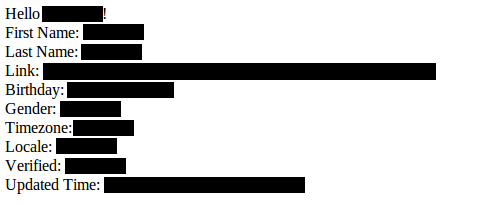
First, include the follow lines of HTML code inside the template body:
<div>Hello
    <span id="name">Guest</span>!<br />
    <div id="other_information" style="display: none;">
        First Name: <span id="first_name"></span><br />
        Last Name: <span id="last_name"></span><br />
        Link: <span id="link"></span><br />
        Birthday: <span id="birthday"></span><br />
        Gender: <span id="gender"></span><br />
        Timezone: <span id="timezone"></span><br />
        Locale: <span id="locale"></span><br />
        Verified: <span id="verified"></span><br />
        Updated Time: <span id="updated_time"></span><br />
    </div>
</div>
Next, call the FB.api function inside fblogin_success.
    <script type="text/javascript">
    function fblogin_success(){
        //logged in user
        FB.api('/me', function(response) {
            $('#name').html(response.name);
            $('#first_name').html(response.first_name);
            $('#last_name').html(response.last_name);
            $('#link').html(response.link);
            $('#birthday').html(response.birthday);
            $('#gender').html(response.gender);
            $('#timezone').html(response.timezone);
            $('#locale').html(response.locale);
            $('#verified').html(''+response.verified);
            $('#updated_time').html(response.updated_time);
            $('#other_information').show();
        });
    }
    function fblogin_fail(){
        //guest
    }
    </script>
The codes above simply waits for the response from FB.api call and then sets the loaded values (dynamically using jQuery) inside the respective span elements. The element with ID other_information is first hidden from the user view and will only be shown once the user values have been loaded and set.
Note that the jQuery selector $() simply accepts arguments such as classes or ids in order to instantly have control over a specific element or a specific set of elements. For more details regarding jQuery selectors, you may visit this page.
The page will look something like this after the page has completed loading.
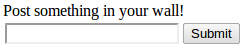
Step 10: You can use FB.api to post messages in your wall. To demonstrate this functionality follow the instructions below.
First, create a div element containing an input box and a button.
<div id="post_div" style="display:none">
    Post something in your wall! <br />
    <input id="post_box"/><button id="post_button">Submit</button>
</div><br />

Next, inside fblogin_success, add the following lines of code to bind a click event function to the button you created.
<script type="text/javascript">
    function fblogin_success(){
        //logged in user
        ...
        $('#post_button').click(function(){
            var body = $('#post_box').val();
            FB.api('/me/feed', 'post', { message: body },
            function(response) {
                if (!response || response.error) {
                    alert('Your post was not published successfully');
                } else {
                    alert('Your post "'+body+'" was published successfully');
                }
            });
        });
        $('#post_div').show();
    }
</script>
The code above simply gets the value of the input box and publishes it in the user’s feed when the button is clicked.
Note that $(‘#id’).click(function) binds an event handler to the click JavaScript event. In this case, when the user clicks on the button Submit, it will execute the statements inside the event handler function.
Upon completion of the api call, a response object is returned and then checked to know whether the post was successfully published or not.

When the post is successful, you should see something like this in your wall.
For reference purposes, the codes are shown below.
# index.html
<html>
<head>
    <!-- JS Files -->
    <script type="text/javascript" src="js/jquery.js"></script>

        <!-- Document Ready functions -->
        <script type="text/javascript">
            //functions which are done when the document is ready
            $(function(){
                fbconnected(function(){
                    // connected to facebook
                    fblogin_success();
                },function(){
                    // not connected to facebook
                    fblogin(fblogin_success,fblogin_fail);
                });
            });
    </script>
    <script type="text/javascript">
        function fblogin_success(){
            //logged in user
            FB.api('/me', function(response) {
                $('#name').html(response.name);
                $('#first_name').html(response.first_name);
                $('#last_name').html(response.last_name);
                $('#link').html(response.link);
                $('#birthday').html(response.birthday);
                $('#gender').html(response.gender);
                $('#timezone').html(response.timezone);
                $('#locale').html(response.locale);
                $('#verified').html(''+response.verified);
                $('#updated_time').html(response.updated_time);
                $('#other_information').show();
           });
           $('#post_button').click(function(){
               var body = $('#post_box').val();
               FB.api('/me/feed', 'post', { message: body },
                   function(response) {
                       if (!response || response.error) {
                           alert('Your post was not published successfully');
                       } else {
                           alert('Your post "'+body+'" was published successfully');
                       }
               });
           });
           $('#post_div').show();
       }
       function fblogin_fail(){
           //guest
       }
    </script>
</head>
<body>

    <div id="post_div" style="display:none">
        Post something in your wall! <br />
        <input id="post_box"/><button id="post_button">Submit</button>
    </div><br />
    <div>Hello
        <span id="name">Guest</span>!<br />
        <div id="other_information" style="display: none;">
            First Name: <span id="first_name"></span><br />
            Last Name: <span id="last_name"></span><br />
            Link: <span id="link"></span><br />
            Birthday: <span id="birthday"></span><br />
            Gender: <span id="gender"></span><br />
            Timezone: <span id="timezone"></span><br />
            Locale: <span id="locale"></span><br />
            Verified: <span id="verified"></span><br />
            Updated Time: <span id="updated_time"></span><br />
        </div>
    </div>
</body>
</html>
#views.py
from django.shortcuts import render_to_response
from django.template import RequestContext

def index(request):
    context = {}
    return render_to_response('index.html',
        context, context_instance=RequestContext(request))
#templatetags/fbconnect.py
from django import template
from django.conf import settings
from fbproject.settings import FB_APP_ID, FB_APP_SECRET
register = template.Library()
facebookLoginScript = """
    <!-- Facebook Login -->
    <script type="text/javascript">
        fblogin = function(success,fail) {
            FB.login(function(response) {
                if (response.session){
                    if(response.perms){
                        if (success!=null){
                            success();
                        }
                    } else {
                        if (fail!=null){
                            fail();
                        }
                    }
                } else {
                    fail();
                }
           },
       {perms:'read_stream,
               publish_stream,
               offline_access,
               user_photos'});
       };
    </script>
    <!-- Facebook Login Status -->
    <script type="text/javascript">
        function fbconnected(success,fail){
            FB.getLoginStatus(function(response) {
                if (response.session) {
                    if(success!=null) success();
                } else {
                    if(fail!=null) fail();
                }
            });
        }
    </script>
"""

class FacebookLoginScriptNode(template.Node):
    def render(self, context):
        return facebookLoginScript
    def facebook_login_script(parser, token): return FacebookLoginScriptNode()
        register.tag(facebook_login_script)
        facebookLoadScript = """
            <!-- Load the Facebook SDK -->
            <div id="fb-root"></div>
            <script src="http://connect.facebook.net/en_US/all.js"></script>
            <script>
                FB.init({
                    appId  : '%s',
                    status : true,
                    cookie : true,
                    xfbml  : true
                });
            </script>
        """ % FB_APP_ID

class FacebookLoadScriptNode(template.Node):
    def render(self, context):
        return facebookLoadScript
    def facebook_load_script(parser, token): return FacebookLoadScriptNode()
        register.tag(facebook_load_script)
Stay tuned to next second part of this tutorial.
References: